Unlocking Data Insights with Airbyte, BigQuery, Dbt, and Dagster: A Comprehensive Guide


Table of contents
Introduction
In the digital age, data is more valuable than ever before. Every click, like, and swipe generates a wealth of information waiting to be explored. To harness this power, businesses and organizations turn to data analytics to make informed decisions and gain a competitive edge. However, data analytics requires a robust ELT (Extract, Load, Transform) process, which can be a complex and resource-intensive task.
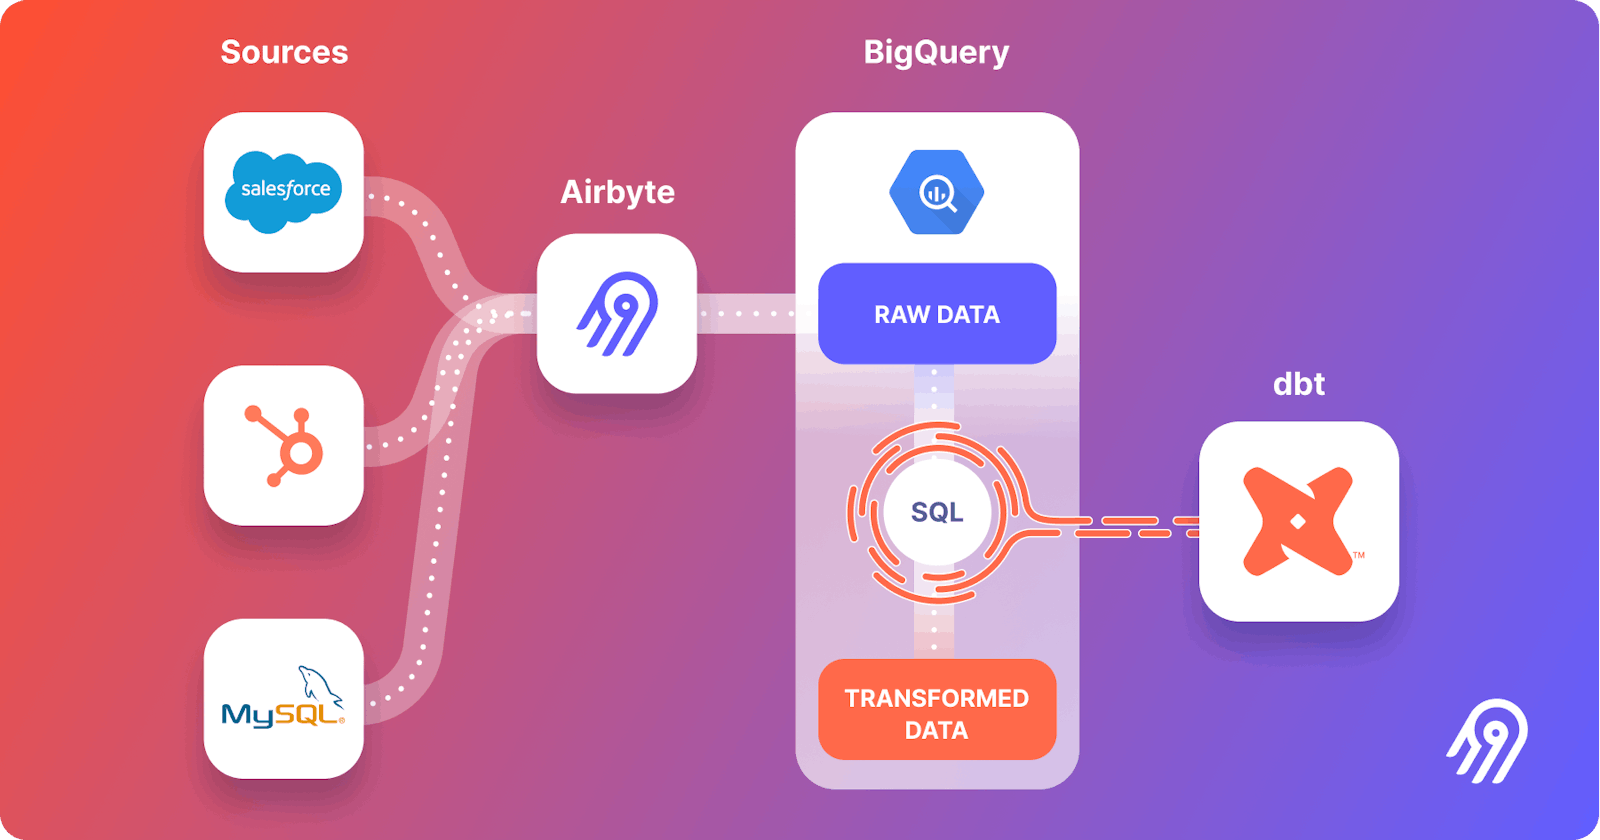
This is where Airbyte, BigQuery, dbt, and Dagster come to the rescue. In this comprehensive guide, we will walk you through the entire process of leveraging these powerful tools to extract data, transform it, and load it into a data warehouse for insightful analysis. But first, let's start with a brief introduction to Airbyte and its use case.
What is Airbyte?
Airbyte is an open-source data integration platform designed to make ELT processes easier, more efficient, and accessible to everyone. It offers a wide range of source connectors that enable you to fetch data from various APIs, databases, and applications. Its user-friendly interface, customizable configurations, and powerful transformations make it a go-to choice for data engineers and analysts alike.
Use Case: Unlocking Recreational Insights with Airbyte
To illustrate Airbyte's potential, let's dive into a practical use case that I've used. Imagine you work for a national park management organization responsible for ensuring a seamless experience for visitors. Your goal is to analyze data from the Recreation.gov API to understand which recreational spots are most popular, the booking trends, and seasonal demands. This information will help you optimize resource allocation, improve visitor experiences, and increase revenue.
Here's how you can achieve this using Airbyte and the ELT stack:
Prerequisites:
Before you embark on this integration, ensure you have the following set up and ready:
Python 3.10 or later: If not installed, download and install it from Python's official website.
Docker and Docker Compose (Docker Desktop): Install Docker following the official documentation for your specific OS.
Airbyte OSS version: Deploy the open-source version of Airbyte. Follow the installation instructions from the Airbyte Documentation.
Terraform: Terraform will help you provision and manage the Airbyte resources. If you haven't installed it, follow the official Terraform installation guide.
Google Cloud account with BigQuery: You will also need to add the necessary permissions to allow Airbyte and dbt to access the data in BigQuery. A step-by-step guide is provided below.
Setting Up BigQuery:
1. Create a Google Cloud Project
If you have a Google Cloud project, you can skip this step.
Go to the Google Cloud Console.
Click on the "Select a project" dropdown at the top right and select "New Project".
Give your project a name and follow the steps to create it.
2. Create BigQuery Datasets
In the Google Cloud Console, go to BigQuery.
Make two new datasets:
raw_datafor Airbyte andtransformed_datafor dbt.- If you pick different names, remember to change the names in the code too.
How to create a dataset:
In the left sidebar, click on your project name.
Click “Create Dataset”.
Enter the dataset ID (either
raw_dataortransformed_data).Click "Create Dataset".
3. Create Service Accounts and Assign Roles
Go to “IAM & Admin” > “Service accounts” in the Google Cloud Console.
Click “Create Service Account”.
Name your service account (like
airbyte-service-account).Assign the “BigQuery Data Editor” and “BigQuery Job User” roles to the service account.
Follow the same steps to make another service account for dbt (like
dbt-service-account) and assign the roles.
How to create a service account and assign roles:
While creating the service account, under the “Grant this service account access to project” section, click the “Role” dropdown.
Choose the “BigQuery Data Editor” and “BigQuery Job User” roles.
Finish the creation process.
4. Generate JSON Keys for Service Accounts
- For both service accounts, make a JSON key to let the service accounts sign in.
How to generate JSON key:
Find the service account in the “Service accounts” list.
Click on the service account name.
In the “Keys” section, click “Add Key” and pick JSON.
The key will download automatically. Keep it safe and don’t share it.
Do this for the other service account too.
Step 1: Extract with Airbyte
First, you'll set up Airbyte to extract data from the Recreation.gov API. If you are new to Airbyte here is a guide to setting up the Airbyte open source version locally on your system. You can use both the Airbyte UI and Terraform provider to make a connector, but for now, we will use the Terraform.
Make a Directory and Navigate to it:
mkdir outdoor_activity_analytics_recreation

cd outdoor_activity_analytics_recreation
Set Up a Virtual Environment:
For Mac:
  python3 -m venv venv
  source venv/bin/activate
For Windows:
  python -m venv venv
  .\venv\Scripts\activate
Now create a Python file name setup.py where we will write a Python script to install the required packages.
from setuptools import find_packages, setup

setup(
    name="airbyte-dbt-dagster",
    packages=find_packages(),
    install_requires=[
        "dbt-bigquery",
        "dagster",
        "dagster-cloud",
        "dagster-dbt",
        "dagster-airbyte",
    ],
    extras_require={"dev": ["dagit", "pytest"]},
)
Install those dependencies:
pip install -e ".[dev]"
Now create file infra/airbyte under outdoor_activity_analytics_recreation which will also include below three files
provider.tf: Defines the Airbyte provider.main.tf: Contains the main configuration for creating Airbyte resources.variables.tf: Holds various variables, including credentials.
Adjust the configurations in these files to suit your project's needs. Specifically, provide credentials for your BigQuery connection. You can utilize the variables.tf file to manage these credentials. I'll leave the repo link below where you could find all the code.
Initialize Terraform:
This step prepares Terraform to create the resources defined in your configuration files.
terraform init
Review the Plan:
Before applying any changes, review the plan to understand what Terraform will do.
terraform plan
Apply Configuration:
After reviewing and confirming the plan, apply the Terraform configurations to create the necessary Airbyte resources.
terraform apply
Verify in Airbyte UI:
Once Terraform completes its tasks, navigate to the Airbyte UI. Here, you should see your source and destination connectors, as well as the connection between them, set up and ready to go.
Step 2: Transform with dbt
With the raw data in hand, it's time to shape it into a format suitable for analysis. This is where DBT (Data Build Tool) comes into play. dbt is a data transformation tool that operates through SQL and models. You write SQL queries to clean, enrich, and structure the data. For your national park use case, you'd create dbt models to represent your desired data schema and relationships.
For example, you may create models that calculate the average ticket price for tours during peak seasons or determine which camping spots have the highest occupancy rates. With dbt, you ensure the data is consistent, accurate, and ready for analysis in your data warehouse.
Setting up the dbt project requires specifying connection details for your data platform, in this case, BigQuery. Here’s a step-by-step guide to help you set this up:
Create and Navigate to the dbt Project Directory:
 mkdir dbt_project
 cd dbt_project
Update Connection Details:
Now you need to create a file name
profiles.ymlin thedbt_project. This file contains configurations for dbt to connect with your data platform. Update this file with your BigQuery connection details.Utilize Environment Variables (Optional but Recommended):
To keep your credentials secure, you can leverage environment variables. An example is provided within the
profiles.ymlfile.Make dbt_project file:
Now you need to create a file name
dbt_project.ymlin thedbt_project. Here you need to structure your dbt_project by mentioning some file paths etc. Again don't worry I'll leave the repo link below for you to have a look.Test the Connection:
Once you’ve updated the connection details, you can test the connection to your BigQuery instance using:
dbt debugIf everything is set up correctly, this command should report a successful connection to BigQuery.
Run the Models:
If you would like to run the dbt models manually at this point, you can do so by executing:
dbt runYou can verify the data has been transformed by going to BigQuery and checking the
transformed_datadataset.Visualise the Data(optional):
This is an optional step to visualize the data. We will be using Python and Matplotlib you can use any of your choices. First, we need to install the necessary dependencies and we can do this by the following command.
pip install google-cloud-bigquery matplotlibNow create a folder named "analyses" under the dbt_project directory. Make sure to name the folder the same as you've mentioned in the
dbt_project.ymlfile otherwise, it will throw an error. Next, create a Python file under the "analyses" folder with an appropriate name likemost_common_activities_in_recareas_analysis.py. Now write down your Python script for the analysis. Make sure to set your BigQuery service account JSON file path as environment variables and use it to authenticate with BigQuery.Now after you are done writing your Python script go to the "analyses" folder.
cd analysesNow run the following command to run the Python file. Make sure to replace
most_common_activities_in_recareas_analysis.pywith your actual file name.python most_common_activities_in_recareas_analysis.pyYou should then see a window displaying a beautiful chart.
Step 3: Orchestrate with Dagster
Dagster, an open-source data orchestrator, plays a crucial role in automating and monitoring the ELT process. You create workflows that define the sequence of tasks, ensuring that data is extracted, transformed, and loaded consistently and on schedule.
For your national park organization, you'd set up a Dagster pipeline that triggers the entire process at regular intervals, such as daily or weekly. This ensures that your data is continually refreshed, and your analytics are always based on the latest information.
In this section, we'll walk you through setting up Dagster to oversee both the Airbyte and dbt workflows:
Create and Navigate to the Orchestration Directory:
Switch to the directory containing the Dagster orchestration configurations:
 mkdir orchestration
 cd orchestration
Set Environment Variables:
Dagster requires certain environment variables to be set to interact with other tools like dbt and Airbyte. Set the following variables:
 export DAGSTER_DBT_PARSE_PROJECT_ON_LOAD=1
 export AIRBYTE_PASSWORD=password
Note: The
AIRBYTE_PASSWORDis set topasswordas a default for local Airbyte instances. If you've changed this during your Airbyte setup, ensure you use the appropriate password here.Launch the Dagster UI:
With the environment variables in place, kick-start the Dagster UI:
dagster devAccess Dagster in Your Browser:
Open your browser and navigate to:
http://127.0.0.1:3000Here, you should see assets for both Airbyte and dbt. To get an overview of how these assets interrelate, click on "view global asset lineage". This will give you a clear picture of the data lineage, visualizing how data flows between the tools.
Materialize Dagster Assets: In the Dagster UI, click on "Materialize all". This should trigger the full pipeline. First, the Airbyte sync extracts data from the source and loads it into BigQuery, and then dbt to transform the raw data, materializing the
stagingandmartsmodels.
Github Repo link: here.
My Experience Throughout this Hackathon:
At first glance, I knew this wouldn't be easy, but I still tried to contribute because I had to participate in Hacktoberfest, and it was offering some great prizes, so why not? I spent one-week gaining insights about Airbyte and Data Engineering. Then, I began contributing by writing quickstarts. After about a week, some folks reached out to me asking for help with the quickstart. I helped them as much as I could. Open source also means collaboration, so that's how I made some new friends. Overall, this October was full of learning and fun, and I'm thankful to Hashnode and Airbyte for organizing such an awesome hackathon.
Conclusion
In this comprehensive guide, we've explored how Airbyte, BigQuery, dbt, and Dagster can work together to streamline the entire ELT process, from data extraction to analysis. The use case of a national park management organization illustrates how these tools can unlock valuable insights, improve decision-making, and drive success.
By leveraging the power of these tools, you can embark on your data-driven journey, unlocking the full potential of your organization's data. Whether you're in the national park management business or any other industry, this ELT stack empowers you to harness the true value of data and stay ahead in the competitive landscape.